Friday, August 30, 2013

43 interruption

Hey there.
Not exactly the photo you'd like to see at the start of a long weekend or anytime for that matter, but I wanted to share this with you in hopes of anyone who's experienced this can shed some light or at least know they're not alone. For the past month, we have been in and out of our pediatrician's office, seen multiple dermatologists, went to both urgent care and the emergency room and finally a pediatrician dermatologist. It started out with a small rash behind the thighs, but gradually spread throughout the entire body from her scalp to her feet. The doctors were baffled. Multiple diagnosis from Gianotti-Crosti syndrome to Pleva to Scabies to the most recent, a Gianotti like Coxsakie A6 virus and the countless prescribed medicines from steroid creams to antibiotics to anti-inflammatories.
It has been a nightmare.
The picture above was taken at the start of this virus and has gotten much worse. I'll spare you the pictures. The last doctor (the pediatrician dermatologist) feels confident with his diagnosis and has seen this in many of his patients in the past year. The good news: it's self limiting and will resolve on its own. The bad news: it can last as long as 8 weeks. We're halfway through. I believe ( I pray) we have gone though the worst of it this past week. 
The question I'm sure you're wondering is, is it contagious? Yes. Apparently in the the first week or so it is contagious through interaction with other small children and can also be airborne from a sneeze. It's most contagious in small children. Adults and older children aren't susceptible due to our immune system and apparently once you get it, it is highly unlikely you'll get it again. Lala is well past the contagious stage, but her appearance can be alarming to those who don't know.
Speaking of public reaction, people can be cruel. I understand they're scared because they don't know, but to stare with disgust, especially when Lala is greeting you is just downright uncalled for. Some parents cringed and some (bless their hearts) smiled and carried a conversation with her. It was so hard to hold back the tears.
So kindly excuse the interruption. I'm stepping away for a brief moment to just hang out, play, nurture, love and help Lala get back to her usual rambunctious self.
See you soon!
***


Monday, August 19, 2013

21 Hanami Pattern by Straight Grain

Hello folks!
Let's start the week with a new pattern by none other, An from Straight Grain.
*applause*
This woman is amazing, but I'm sure you already knew that! I just love her approach to little girls' clothing... simple and feminine. It's refreshing to see her timeless designs in an otherwise trendy world of fashion. So when An asked for pattern testers for the Hanami pattern, I pounced on the chance! I mean look at this pattern... how adorbs is this?!
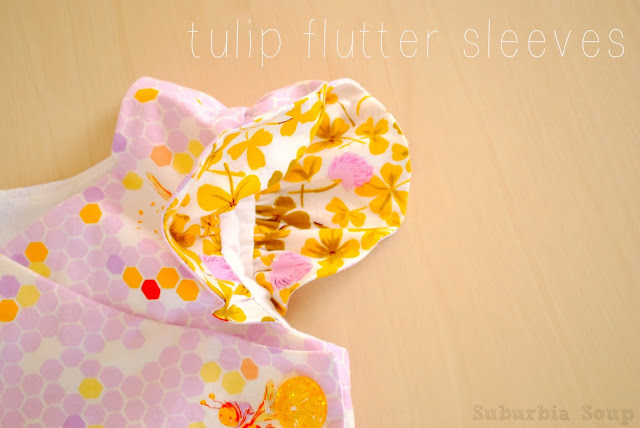
The pattern has the option of a dress or top, crossed back or zipper, collar or no collar and ruffle sleeve or tulip flutter sleeves. I opted for crossed back top with tulip flutter sleeves. Crazy options, ay?
I sewn up a size 3Y which is equivalent to a 3T here in the US.
Isn't the back darling? This is what got me hooked. If I was to see this on a hanger, my first thoughts would be the back being the front and I honestly would've thought nothing more of it, but it's not.
 THIS is the back. 
Now, I have a little secret.
I don't do zippers.
I know-I know... it sounds ridiculous and especially coming from someone who has sewn for such a long time, but I just don't care for it. I'm a bit intimidated by it actually but if my buttonhole maker keeps misbehaving, I just might give in and start sewing zippers.
I added contrasting fabric to the sleeve lining... a cute little surprise!
 The fabric is the Briar  Rose collection by Heather Ross (loooove!) and the buttons are from a local fabric shop (they have a big chest full of buttons).
Now here's what I did differently.
I made the top into a wrap versus a pull over with snaps on the inside. The reason I did this was because Lala is... how should I say... slightly above average in the weight category, so when I initially made this into a pullover and tried to put it on, it was anything but easy. I am loving this change. LOVE-LOVE-LOVE! And with the overlapping of the ruffled flounce just adds to the cuteness factor.
The top took less than a day to make and An's step by step instructions along with great photos made the whole sewing experience a pleasant one. You could probably get by just by looking at the photos!
Overall, this pattern is an A+ in my book. Easy to follow instructions, great photos, a plethora of style options and a classic design... how can you go wrong? Check it out for yourself! The pattern is available HERE. If you're still not convinced, check out all the other bloggers who tried the pattern starting today and throughout the week.
You too will soon agree that the Hanami pattern is 'ichiban'!!!
***

1 Tumble Tee Winner!


And the winner goes to...
NANCY who said:
You certainly know how to make a basic design S H I N E ! ! ;)

***
Shoot me an email with your info, Nancy and I'll send you your free Tumble Tee pattern!
Thanks everyone for all of your lovely comments!
***

Monday, August 12, 2013

23 Let's Make: Sunglass Masks

Hey there!
Let's take a little break from sewing (step away from the sewing machine) and let's do a little craftin', shall we? I had originally wanted to do this tutorial two years ago in October, but never got around to it. So I thought, "why not do it now in the summer?". Perfect! It's summertime, the kids are home, sunglasses are abundant and anytime is a good time to play make believe!
A couple years back, I was in the process of making Lala's Halloween costume. She was going to be an owl. The body of the costume was all sewn, but the face was my challenge. I remember being a kid and getting the costumes in a box. Remember those? The ones where it was a full body outfit (a one  piece) made out of plastic and it came with a mask that swallowed your face. Within 5 minutes of wearing the mask, your face is drenched in sweat and you begin to feel claustrophobic  because the holes for the nose and eyes were too small, remember?! So by the time you finished one block of trick-or-treating in your neighborhood, the mask was either in your candy bag or on top of your head. I even remember a couple of times, the mask ripping. Ahhh...good times.
Where was I? Oh yeah, Lala...
So I needed to create a mask that was going to be easy to make, easy to put on or take off and comfortable to wear. I was stumped. It wasn't until I saw a picture somewhere of the 2000 New Year's Eve glasses, you know the ones I'm talking about. Where your eyes are in the "00", between the "2" and  last "0". That's when it hit me... why not glue a mask to an old pair of sunglasses? And that's what I did! It was a huge success. Lala wore the mask with no problems and it got a lot of use. Even Sophia (my eldest) wore it to her school spirit day just last year. So if you're in the market for easy to make and easy to wear masks, pull up a chair and let's get craftin'!

***
SUPPLIES:
-sunglasses(any sunglasses will do)
-hot glue
-Fabri-Tac glue
-plain white paper
-pencil
-fine tip sharpie
-medium tip
-felt
-foam craft paper
-scissors
-needle and thread (optional)
-*velcro
*If you only have one pair of sunglasses, use velcro to attach to the masks. This way allows you to make multiple masks and only using one pair of sunglasses.
***
First, pop out the lenses and with a pencil and paper, trace around frame. With the black Sharpie, go over what you traced. This will be your template.
Take your template and placed it underneath a plain white paper. Draw your mask. Make sure to draw the eyes within the frames of your template. Once you draw your mask, you will then need to create pattern pieces for all the details on your mask. Once you've drawn out all the pieces, you will need to cut them out.
Place your pattern pieces on top of the felt and trace the pattern with a fine tip Sharpie. Cut out pattern pieces.
Take your main pattern piece (the face) and adhere it to the foam craft paper using Fabri-Tac glue. Carefully cut around the felt. Make sure to cut an opening for the eyes.
Adhere details to the face using Fabri-Tac glue. Allow glue to dry. If you're feelin' extra crafty, you can stitch on the details.
Apply hot glue to the frames of the sunglasses and carefully attach to the back of the mask. Clean up any glue boogers. Once glue is cool... it's show time!
Only able to sacrifice one pair of sunglasses? No problem!
Attach velcro to the sunglasses and to the back of the mask using hot glue. Let it set and get ready to be anyone or anything your heart desires! 
Can you guess what the last picture is?
Pretty easy to make, huh? Now it's your turn!
Make sure to share your creations over HERE. I'd love to see what you make!!!
***


Saturday, August 10, 2013

0 I'm over here: Compagnie-M

Yahoo! It's the weekend!
Come on over to Marte's place and see what I made with the Ruffle Me Tee. Haven't heard of this pattern?
Well what are ya waitin' for?!
Run! Skip! Jump!
Grab this FREE pattern and see what I made!
***


Thursday, August 8, 2013

22 Tumblin' Along


When Rachael invited me to do the blog tour, my mind raced with endless possibilities of modifying the Tumble Tee. I thought of adding fun pockets like the pouch I did HERE and I thought of altering the sleeves to make it like a dolman style dress, but honestly... when you have a great basic design, why change it?
So I didn't.
And I'm happy.
The fabrics were from my last trip to L.A.'s fabric district.
I had other plans for these fabrics. The floral was intended for the older girls and the stretch lace was for a different top for Lala. Change one-change two and here we are!
The pattern was quick and easy. I think the only hard part was deciding whether to make it a top or a dress. Perhaps the next Tumble Tee will be a modified rendition and yes... there will be a next!
So have you made a Tumble Tee, yet? Haven't got the pattern?
Say wha?!
Do I have a goody for you!
Leave a comment here no later than August 16th, the winner will be announced on the 18th and Rachael will send the lucky duck their very own Tumble Tee pattern.
Easy-schmeasy!
***
So keep tumblin' with us and make sure to visit all the other lovely blogs on the tour!


***

Blogging tips